Handling and Soldering Opto Components (IRED)
Care must be taken in the handling and soldering of all opto components, especially those that use a cast or molded plastic and lead frame construction. In lead frame type construction, the detector chip is mounted directly to one lead and a wire bond is made from the chip to the other lead. The encapsulating plastic is the only support for the lead frame. Unlike the familiar black plastic IC packages, clear opto epoxies have no fiberglass filler. Thus, they are not as strong as plastic IC packages. Care must by taken when forming the leads of plastic opto packages. Excessive mechanical force can cause the leads to move inside the plastic package and damage the wire bonds. Weakened bonds can then “open up” under further mechanical or thermal stressing, producing open circuits.
In order to form leads safely, it is necessary to firmly clamp the leads near the base of the package in order not to transfer any force (particularly tension forces) to the plastic body.
This can be accomplished either through use of properly designed tooling or by firmly gripping the leads below the base of the package with a pair of needle nose pliers while the leads are being bent.

Examples of Tooling Fixtures Used to Form Leads
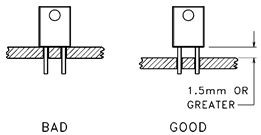
For highest reliability, avoid flush mounting the plastic body of the printed circuit board. This minimizes mechanical stresses set up between the circuit board and the plastic packages. it also reduces solder heat damage to the plastic package.

Good printed circuit board layout avoids putting spreading (plastic under tension) force of the leads of a plastic package.

When hand soldering, it is important to limit the maximum temperature of the iron by controlling the power. It is best if a 15W or 25W iron is used. The maximum recommended lead soldering temperature (1/16" from the case for 5 seconds) is 260°C. An RMA rosin core solder is recommended.
Sn60 (60% tin/40% lead) solder is recommended for wave soldering opto components into printed circuit boards, other alternatives are Sn62 and Sn63. The maximum recommended soldering temperature is 260°C with a maximum duration of 5 seconds. The amount of tarnish on the leads determines the type of flux to use when soldering devices with silver plated leads.
| Condition of Leads | Recommended Flux |
| Clear Bright Finish (Tarnish Free) Dull | RMA - Mildly Activated |
| Finish (Minimal Tarnish) | RMA - Mildly Activated RA |
| Light Yellow Tint (Mild Tarnish) | - Activated |
| Light Yellow/Tan Color (Moderate Tarnish) | AC - Water Soluble, Organic Acid Flux |
| Dark Tan/Black Color (Heavy Tarnish) | Leads Need to be Cleaned Prior to Soldering |
Cleaners designed for the removal of tarnish from the leads of electronic components are acidic and it is best to keep to immersion time as short as possible (less than 2 seconds) and to immediately wash all devices thoroughly in ten rinses of deionized water.
The best policy is one which prevents tarnish from forming. Tarnish, which is a compound formed when silver reacts with
sulfur (Ag2S), can be prevented by keeping the components away from sulfur or sulfur compounds. Since two major sources of sulfur are room air and paper products, it is best to store the devices in protective packaging such as “silver saver” paper of tightly sealed polyethylene bags.
After soldering, it is necessary to clean the components to remove any rosin and ionic residues. For a listing of recommended cleaning agents please refer to Application Note How to clean Excelitas Infrared Emitting Diodes (IREDs)?
Article based on Application Notes from Excelitas Technologies Photometric and Radiometric Terms application note
Heard on the Internet
Imagination is more important than knowledge.
Albert Einstein


